Before jumping in and checking out all hero has to offer it's important to have a good understanding of the interface.
The first thing you will see after logging in is the Advisor’s Dashboard as shown below.
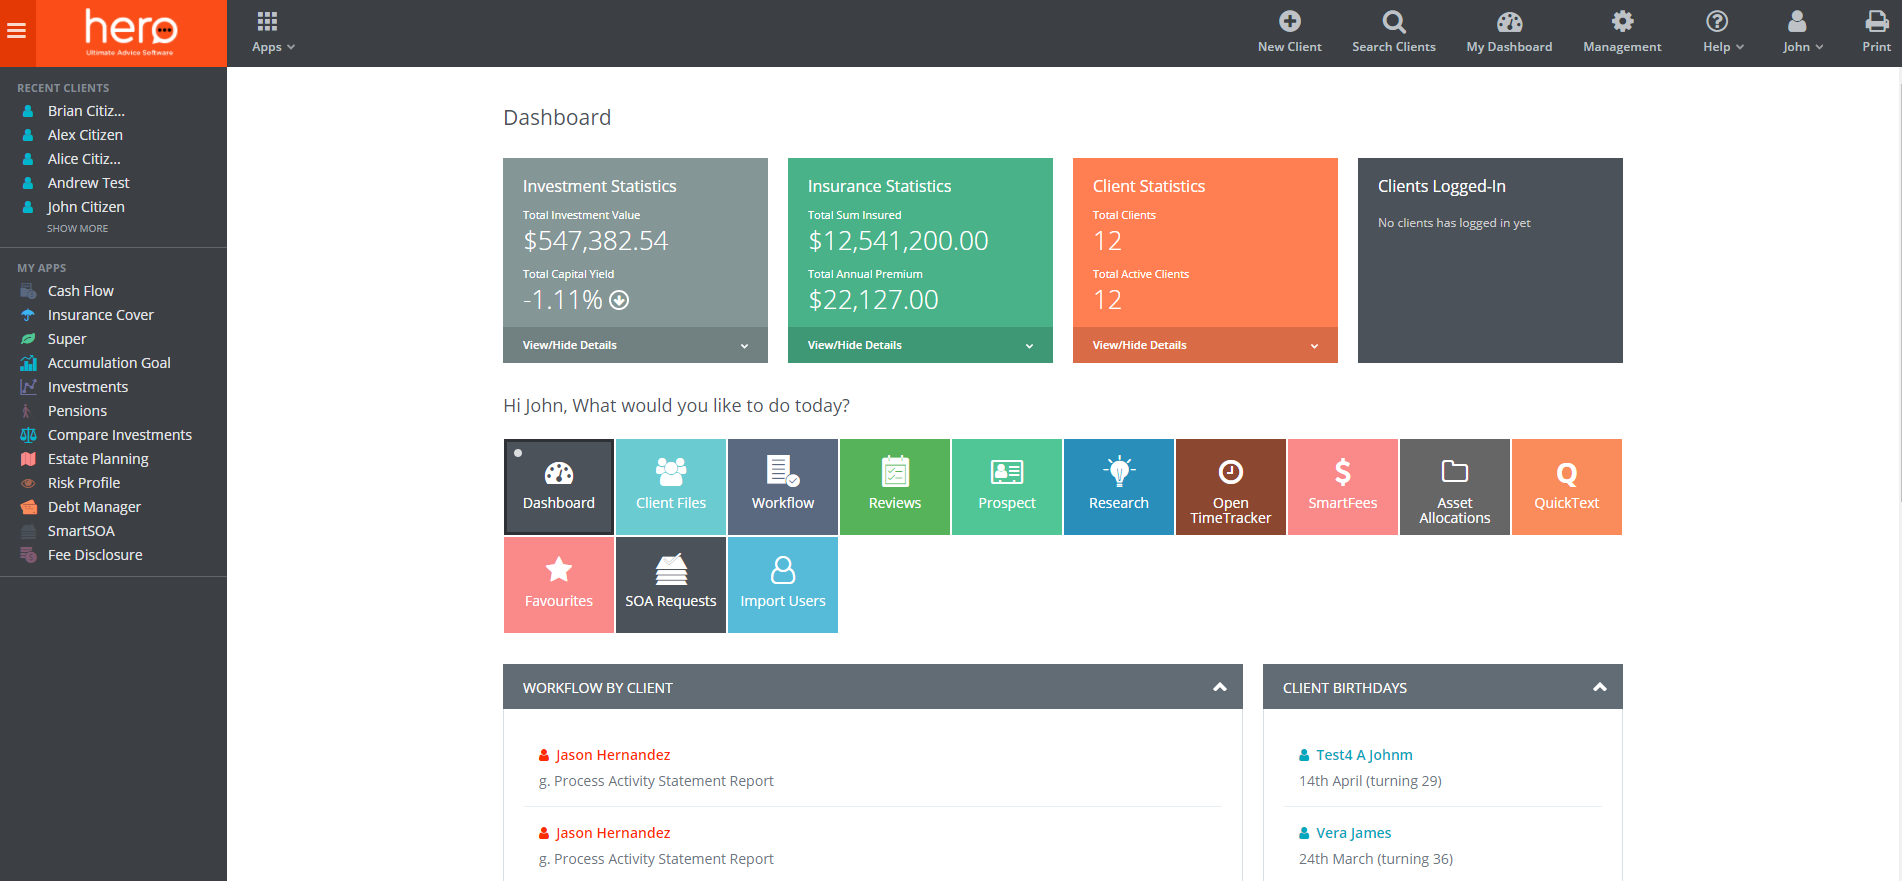
The Dashboard is the central page for your practice and from here you can manage all the day-to-day staff and client activities.
Let’s start from the top.
The top bar contains action buttons for editing your details, managing staff and adviser assignments, accessing our Help Files and print screens. We strongly recommend that you use our Help Files as they cover everything you need to know about getting the best outcome out of your hero platform.
Next, you will see that the remainder of the page is broken down to a range of sections, boarded by a grey line. To start let’s look at the far left where you can see the following;

You can view the most recent client files and by clicking on the name of of a client you will be able to access their file.
Below this is the "My Apps" list. This is a list of current available modules that you can use for your clients. The outcome features of the "My Apps" section changes to reflect the page you are dealing with.
For example, if you click on the "My Apps" whilst in the Dashboard page, you will access the online reporting of your practice. Clicking on Insurance cover gives you a complete report on who are your underwriters, types of cover and number of policies and allows you to drill down to a group or single client view.
If you are viewing a single client, My Apps relate to the modules you are using solely for that client. You will see all the relevant applications used for that client and information pertaining to that client only will be displayed, unlike the Dashboard view which has the entire practice view.
Next is your Tool Box containing a range of calculators, Super Seeker tools, Market Summary reports, Strategy Text creation and Practice Overview.
For Compliance Managers and RM of AFSL's we have additional tools to help with the management of staff, audits, ARs and compliance measures.
The central part of the page is the command centre, this is a complete dynamic portion of the page, with changing data and where you can view your practice in real-time.
On the top are 4 colour coded boxes that are expandable to display active data.
Click on Investment Statistics to view Superfunds, funds held in investment companies and everything in-between.
Click on the Insurance Statistics providers to view a detailed report on the Adviser Insurance Portfolio.
Clicking on the Client Statistics this gives you a complete overview of your client’s position, risk profile, pending review and how many files may have compliance concerns via SmartCheck.
Finally, you can view which clients have logged into the system and the date and time that they accessed their files.
Next, within the centre section of your Dashboard are up to 13 active ‘Hot Button” options for you to use in planning and designing your practice advice position. For example, if you click on the "Workflow" button you will see ALL the open workflow tasks for your practice by client name, these are colour coded to easily identify tasks that are overdue, in progress and upcoming.
Let’s look at the Hot buttons listed for you to use.
Dashboard - gives you a refreshed view of all the actions within your practice.
Client Files - gives you a refreshed view of all your clients including Prospects.
Workflow - is your practice process manager completely editable and customisable to suit your office procedures.
You can also manage the template designs of your Workflow here as well.
Reviews - is as the name suggest, your pending review manager.
Prospects - is a pipeline manager.
Research - this is your resource to upload or add external research sites that is central to your practice.
Open Time Tracker - is your Fee for Service and Staff time task manager tool.
SmartFees - Your insight practice fee management tool.
Asset Allocations - is a list of all investments out of sync with their Asset Allocation and/or Risk Profile.
QuickText - is where you can globally edit your strategy text.
Favourites - is a list of your preferred investments for clients.
SOA Requests - is a list of your SOA requests.
Import Users - you can import new clients into Hero by uploading client information in CSV file format. One of Hero's team members will get the request actioned within no time.
Finally, displayed on the Dashboard central page view are the dynamic changes within your practice management.
When you first view this section you will note that there are 6 task bars, these task bars are collapsible and movable allowing you to arrange this display in the manner that is best suited to your needs.
The three key aspects are:
Workflow Manager- this section outlines which staff member is working on what file and the status and duration of the file.
Workflow by client - offers a similar view by highlighting the most recent task and their duration in relation to a client
Practice Actions – this task bar keeps you informed about ALL the actions that relate to All your clients, for example if a client has been sent an SMS, that action would be displayed in the Practice Actions screen.
Then you have 3 client focus task bars:
Clients Birthdays – as the name suggest this displays all upcoming birthdays within the next 30 days.
Anniversaries - this relates to data captures within the Advance Fact Finder and will display such things as Binding Death Nominations and even wedding anniversaries.
Client Activities – this is one of the key task bars for you to view, as it displays any actions that your client may have undertaken by logging into the portal; for example, if they up-dated a new address you will instantly see it, this task bar identifies ALL client actions for your convenience.
Finally, as previously mentioned, within this section you can design the layout to suit your needs and to do this simply minimise the task bar then place your cursor over the main task bar and your cursor will become a 4 point tool, click on your mouse and simply move the bar to where you want it.
Now you have a good understanding of the Hero interface, let's move into using the client files.
0 Comments